Let’s Make a Minion Hat
Last Updated on August 2, 2017 by lydiaf1963
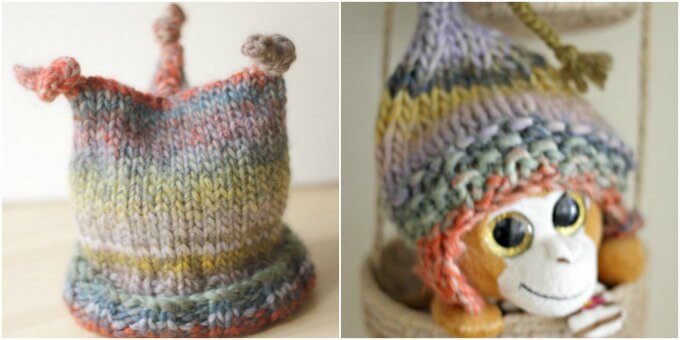
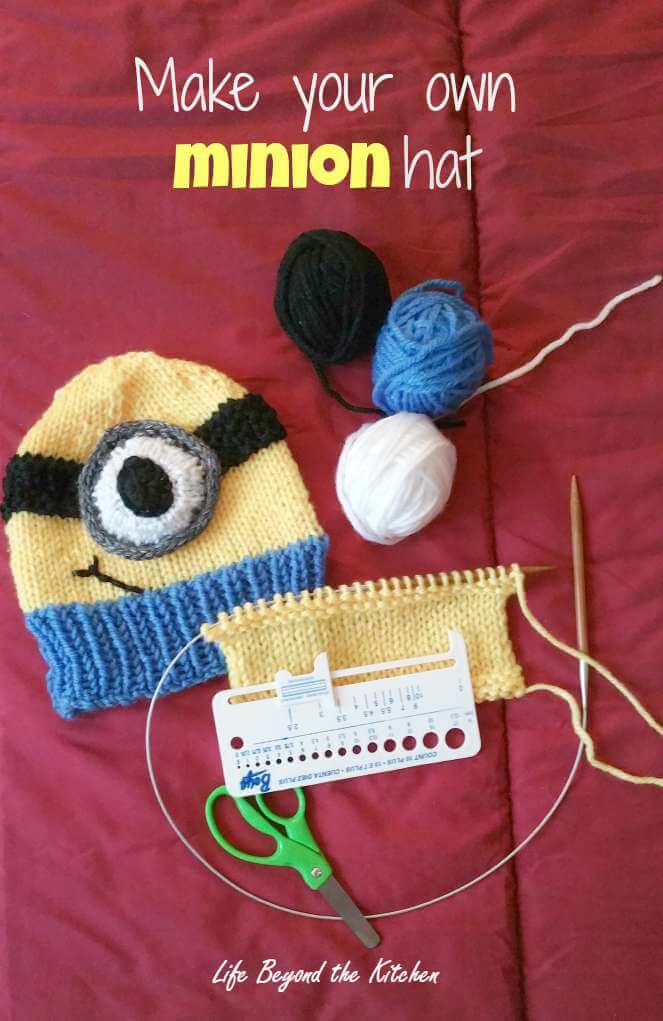
My daughter asked me to make a minion hat for P-Man to wear for Halloween. Thanks to Pinterest I found a couple good patterns from Kriskrafter and Stana’s Critters. They each had their own interpretation for their minion hat and so I picked what I liked about each to make my own version to fit my 6 month old grandson. The construction is pretty basic and I’ll show you a trick to size a perfect hat for your own minion.
To make this hat you’ll need to know how to cast on, knit and purl in the round, knit two together for decreasing, knit front and back for increasing, switch colors and cast off.
I actually like to knit in the round. This hat is constructed from the brim to the crown so I used the magic loop method to make it. Some people like to use double pointed needles; I used them to make my minion’s eye with an i-cord bind off.
My biggest worry was making the hat big enough to fit my grandson. There are charts that give average sizes for children and adults, but I had my daughter measure his head. It was just about 17 inches around. The next step was to make a gauge swatch for the yarn and needles I wanted to use. I used 5.5mm (Size 9) needles and worsted weight yarn for the swatch.
It’s a simple process: cast on 25 or so stitches and knit back and forth for 3 or 4 inches. You want the swatch to be large enough that the edges don’t distort your knitting. Then use a gauge to measure the width of 10 stitches. The gauge should have markings to indicate the number of stitches per inch. Otherwise, divide the width by 10 to find the gauge.
From the swatch I know I have somewhere between 3.25 and 3.5 stitches per inch. And since the hat is going to stretch I made it an inch smaller than his head size for a total of 52 stitches (16 inches around X 3.25 stitches per inch). The gauge would be different with a different weight yarn or different sized needles. Once you know how many stitches to cast on, it’s just a matter of knitting. Adjust your number up or down to give an even number as the brim is made of 1 x 1 ribbing (knit 1, purl 1 around).
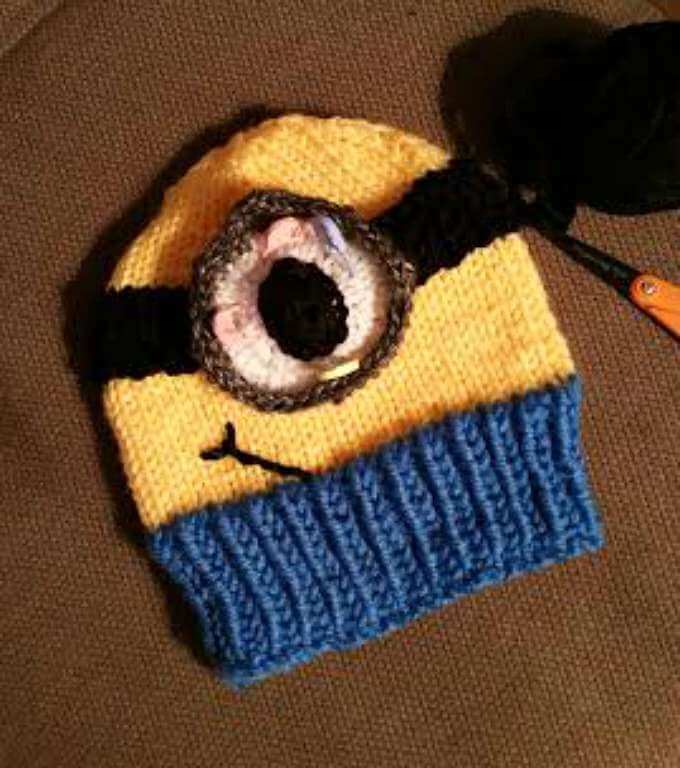
The hat is knit first, then the eye and googles are made separately. The mouth and pupil are embroidered on and finally the eye is attached to the headband. In the photo above you can see how I “pinned” the eye into place with stitch markers. You could certainly make two eyes if you prefer.
Please note I haven’t written a pattern for anyone other than myself before so if there’s anything confusing please let me know in the comments and I’ll either correct or clarify. Thanks!
Materials:
I used worsted weight acrylic yarn, most of it from my “stash.” I only had to buy a small 100 gm skein of yellow and I had some left over.
- yellow, blue (100 gms), black (50 gms), white and gray/silver (scrap)
- 5.5mm/80 cm cable circulars (US Size 9 with a 32″ cable)
- set of 5.5mm (US Size 9) double pointed needles to make the eye
- tapestry needle, scissors, stitch marker
Instructions:
My hat is about 8 inches tall which is more than enough for a young child, but older kids or adults may need some adjustments made in the height. Measure from earlobe to crown for the height and make adjustments by changing the number of rows in the yellow section.
Make the hat:
- With the blue, cast on an even number of stitches (I did 52) and join to work in the round. Place a marker at the beginning of the round. Move the marker as necessary.
- Work K1/P1 ribbing for 12 rounds in blue (or about 2 1/2 inches).
- Switch to yellow and work in Stockinette Stitch (knit every stitch) for 12 rounds (about 2 1/2 inches).
- Switch to black and make the headband for the goggles. I did it in 8 rounds (about 1 1/2 inches) as follows: knit a round, purl a round, 4 rounds of seed stitch (K1/P1 around, then P1/K1 around), purl a round, knit around. [The seed stitch gives some texture and stands out from the rest of the hat, like a strap. Feel free to make the strap however you like…see the other two patterns I’ve linked to for more options.]
- Switch to yellow and knit for a round, then begin the decreases.
- Using the number of stitches cast on, find the closest number divisible by 6. For example: I cast on 52, so I want to decrease to 48. I need to decrease four stitches. 52 divided by 4 = 13. So I knit 11 and knit 2 together around. At the end of the round I should have 48 stitches left (6 sections of 8 stitches each).
- Now for the decreases. For the first round knit 6, then knit 2 together; repeat around. You should end with knit 2 together; and 42 stitches (6 sections of 7 stitches each). Remember your values may be different!
- Next round, knit
- Next round, knit 5, knit 2 together around
- Next round, knit.
- Continue in this manner until you have 12 stitches left. Cut the thread, leaving a long tail.
- Use a tapestry needle to thread the tail through the stitches on the needles and pull to cinch tight. Secure all of the ends on the inside of the hat.
Make the eye(s) and goggle(s)
I used my double pointed needles to make the circle for the eye. You could also crochet the eye if you’re more comfortable with that. You’ll find other methods in the two links above.
The cast on can be tricky, so I’ve linked to a video to help you get started. I seem to always fight the needles and the yarn until I get through two rounds. You could also try Emily Ocker’s Circular Cast On.
- With white, cast on 8 stitches and distribute over four needles.
- Round One: Place a marker at the beginning of the round; knit around (8 stitches)
- Round Two: Knit into front and back of every stitch. (16 stitches total)
- Round Three and all other odd rows: knit around
- Round Four: (K1, knit front and back) x 8 (24 stitches total)
- Round Six: (K2, knit front and back) x 8 (32 stitches total)
- Continue in this manner until the eye is almost as large as you’d like.
- Switch to gray and knit a round.
- Use the i-cord bind off to cast off. Repeat for a second eye if desired.
The eyes were the most difficult part for me. I started over several times trying to get it “just right.”
Embroider the eye(s) and mouth; fasten the eye(s) to the hat:
- Use the tapestry needle to embroider a mouth on the hat; and the eye pupil on the eye. You can use light brown with a black pupil if you want to be accurate.
- Fasten the eye in the position that works for you and sew it to the hat using the gray yarn. I used the groove at the base of the i-cord as a guide.
Enjoy your minion hat!